

前言👻
平时 我们在很多的后台项目中,看到有切换中英文 或者日文之类的按钮,一般像这种网站,都支持国际化。
本篇文章介绍springboot项目中 加入国际化的支持。
本项目中,前端页面用的是thymeleaf,如果不了解springboot和thymeleaf使用的,可以查看我的上一篇文章《springboot集成thymeleaf》
开始😏
首先,我们还是新建一个springboot项目,在pom文件中加入thymeleaf的依赖。
<dependencies>
    <!--模板引擎-->
    <dependency>
        <groupId>org.springframework.boot</groupId>
        <artifactId>spring-boot-starter-thymeleaf</artifactId>
    </dependency>
    <!--解决html校验报错-->
    <dependency>
        <groupId>net.sourceforge.nekohtml</groupId>
        <artifactId>nekohtml</artifactId>
        <version>1.9.22</version>
    </dependency>
</dependencies>
application.properties配置文件中内容
server.port=8081

spring.thymeleaf.prefix=classpath:/templates/

spring.thymeleaf.suffix=.html

spring.thymeleaf.mode=HTML5
spring.thymeleaf.encoding=UTF-8
spring.thymeleaf.content-type=text/html
spring.thymeleaf.cache=false
# 国际化资源文件位置
spring.messages.basename=i18n.messages
# messages 文件的缓存失效时间
spring.messages.cache-duration=1
# 属性配置文件中文乱码问题
spring.messages.encoding=utf-8
# 解决中文乱码
server.servlet.encoding.charset=UTF-8
server.servlet.encoding.enabled=true
server.servlet.encoding.force=true
# 解决Tomcat中文乱码问题
server.tomcat.accesslog.encoding=UTF-8
新建indexController
package com.world.lzh.controller;

import org.springframework.stereotype.Controller;
import org.springframework.ui.ModelMap;
import org.springframework.web.bind.annotation.RequestMapping;

/**
 * @version 1.0
 * @Author lzh
 * @Date 2022/5/5 - 20:13
 **/
@Controller
public class IndexController {

    @RequestMapping("/index.html")
    public String hello(ModelMap modelMap) {
        return "index";
    }
}
以上步骤,和在thymeleaf中前几步完全一样。
接下来 我们开始添加国际化操作的关键部分。
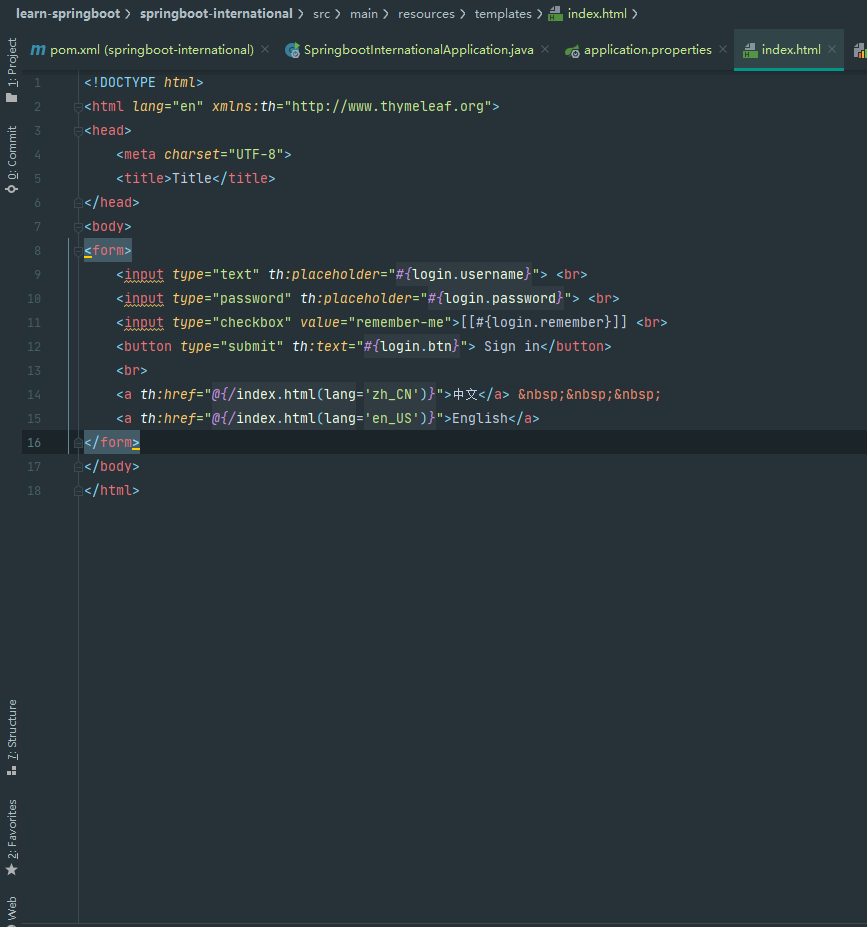
在resources文件夹内i18n文件夹,然后在i18n文件夹中新建三个文件
messages.properties,messages_en_US.properties和messages_zh_CN.properties。
messages.properties为默认配置
login.tip = 请登录
login.username = 用户名
login.password = 密码
login.btn = 提交
login.remember = 记住
messages_en_US.properties为英文配置
login.tip = Please login:
login.username = Username:
login.password = Password:
login.btn = Submit
login.remember = Remember
messages_zh_CN.properties为中文配置
login.tip = 请登录
login.username = 用户名
login.password = 密码
login.btn = 提交
login.remember = 记住
然后我们新建一个index页面
接下来 我们创建国际化配置文件。
package com.world.lzh.config;

import org.springframework.stereotype.Component;
import org.springframework.util.StringUtils;
import org.springframework.web.servlet.LocaleResolver;

import javax.servlet.http.HttpServletRequest;
import javax.servlet.http.HttpServletResponse;
import java.util.Locale;

/**
 * @version 1.0
 * @Author lzh
 * @Date 2022/5/5 - 20:37
 **/
@Component
public class MyLocaleResolver implements LocaleResolver {

    @Override
    public Locale resolveLocale(HttpServletRequest httpServletRequest) {
        Locale locale = Locale.getDefault();
        // 获取请求中的语言参数
        String language = httpServletRequest.getParameter("lang");
        // 验证参数的有效性
        if (StringUtils.hasLength(language)) {
            //zh_CN
            String[] split = language.split("_");
            //国家,地区
            locale = new Locale(split[0], split[1]);
        }

        return locale;
    }

    @Override
    public void setLocale(HttpServletRequest httpServletRequest, HttpServletResponse httpServletResponse, Locale locale) {

    }
}
package com.world.lzh.config;

import org.springframework.context.annotation.Bean;
import org.springframework.context.annotation.Configuration;
import org.springframework.web.servlet.LocaleResolver;
import org.springframework.web.servlet.config.annotation.WebMvcConfigurer;

/**
 * @version 1.0
 * @Author lzh
 * @Date 2022/5/5 - 20:38
 **/
@Configuration
public class ViewConfig implements WebMvcConfigurer {
    @Bean
    public LocaleResolver localeResolver() {
        return new MyLocaleResolver();
    }
}
接下来我们启动项目,使用浏览器访问
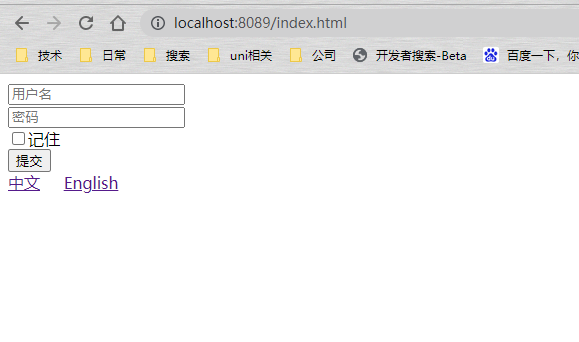
我们可以看到,已经正常显示,然后我们分别点击中文和English按钮,查看效果
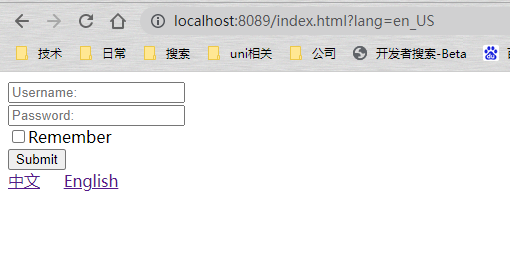
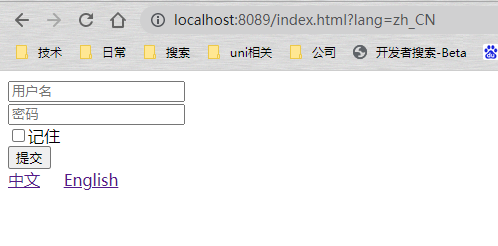
效果非常完美~😛
源码地址:点击访问欢迎评论star⭐
486